
As always, adding code to your blog will not only change its look but it could make or break keeping traffic or getting more business. There are ton’s of codes out their to modify a Genesis Framework child theme but I’m only going to mention 5 that I think any theme could use.
Note: Before adding any of those code snippets to your blog, make a full backup. You can do this through your web host in your cpanel or use a plugin.
1. Rounded Avatar Below Title/Category Page
![]()
Add the following code at the bottom of your functions.php file.
add_action('genesis_entry_header', 'post_author_avatar');
function post_author_avatar() {
if(is_home() || is_single() || is_category( $category  ))
{
echo get_avatar(get_the_author_meta('email'), 40);
}
}
The default size I made is 40 and is a bit to small in my opinion so I changed my avatar size for WPOutcast to 60. View the homepage to see this exact size. Note that you may be limited to a certain size depending on which theme that you are currently using. This is why I added “40” in the code, it’s small and fit’s perfectly on any Genesis Framework Theme.
You will need to add the following .css code to the end of your styles.css file.
.avatar {
background-color: #F5F5F5;
border: 1px solid #DDDDDD;
border-radius: 50% 50% 50% 50%;
padding: 4px;
}
SPACE ISSUE: If you just use my code above and go on your merry way, you will notice a space issue with the Avatar to close to the “By: Derek” line. I found a fix to add more space. Install the Genesis Edits plugin and before the word “By: word, just use your space bar and add some space. Look at the image below how I did this.

If you leave your avatar image size at 40 you will notice the space issue. I increased my avatar size but still added some space in the Genesis Simple Edit’s plugin for extra measures. The fine details is what I try to get fixed and I love sharing these findings with you.
Clear your cache if you are using a caching plugin to see the changes.
- Create your own child theme with the Child Theme Development Tool.
2. Highlight Post Author’s Comment

Add the following code to the bottom of your style.css file. Change the color code for different colors.
li .bypostauthor {
background-color: #E8E8E8;
}
Bonus Code Below: Remove the date and time from comments. (Example is the image above)
Add the code snippet below to the bottom of your style.css file and hit save. Special thank you to WPsites for providing the code for free. This guy is the go-to-guy for Genesis Related customization and it’s worth the price to join his membership site. You get cool codes but you can learn how to code at the same time. He has helped thousands of Genesis Framework customers on the official StudioPress forum with free coding help.
 .comment-meta {
    display: none;
}
Clear your cache if you are using a caching plugin to see the changes.
3. Add A Comment Policy Box

Add the following code at the end of your Functions.php file to add the widget.
//* Register Comment Policy widget area
genesis_register_sidebar( array(
	'id'          => 'comment-policy',
	'name'        => __( 'Comment Policy', 'bg' ),
	'description' => __( 'This is the comment policy widget area.', 'bg' ),
) );
Next add this code to your functions.php file right under the above code:
//* Add Comment Policy widget area before comment form
add_action( 'genesis_comment_form', 'bg_comment_policy', 5 );
function bg_comment_policy() {

	genesis_widget_area( 'comment-policy', array(
		'before' => '<div class="comment-policy"><div class="wrap">',
		'after'  => '</div></div>',
	) );

}
Add this code to your styles.css file and you all done with the coding part.
/* Comment Policy
---------------------------------------------------------------------------------------------------- */

.comment-policy {
	border: 1px solid #edeeee;
	padding: 20px 30px;
}

.comment-policy p:last-child {
	margin-bottom: 0;
}
Go to your widgets dashboard and add a text widget into the comment policy widget like so.

final look:

Clear your cache if you are using a caching plugin to see the changes.
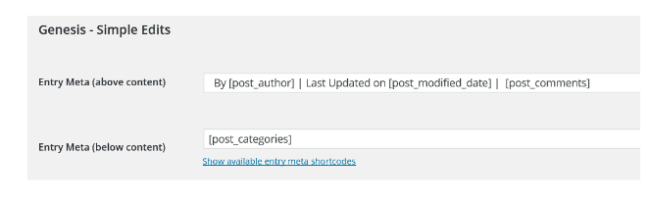
4. Show Last Updated Date

Many people update blog posts weekly and want to show the date it was last modified on. Add the following code to the end of your Functions.php file.
add_filter( 'genesis_post_info', 'sp_post_info_filter' );
function sp_post_info_filter($post_info) {
if ( !is_page() ) {
$post_info = ' by 5 Comments ';
return $post_info;
}}
Please install the Genesis Simple Edits plugin and make sure your settings have the last modified date as shown in the image below.
Clear your cache if you are using a caching plugin to see the changes.
5. Modify The Comment Title Text

Modify this comment section to suite your blog. Example of this is what I changed WPOutcast’s to. Leave a review or feedback on a theme. Add this code to the end of your Functions.php file. Edit this (Thoughts?) text only. Don’t remove any other characters/code.
//* Modify the speak your mind title in comments
add_filter( 'comment_form_defaults', 'sp_comment_form_defaults' );
function sp_comment_form_defaults( $defaults ) {

	$defaults['title_reply'] = __( 'Out Of This World Comments?' );
	return $defaults;

}
Clear your cache if you are using a caching plugin to see the changes.
More Advice To Ponder
Is your blog still running a bit slow? Did you ever think that it could just be your web host? It’s true that some web hosts are just not made for WordPress blogs. I have compiled a list of WordPress Hosting For Bloggers. All of those web hosts are perfect for hosting a WordPress blog. Do check them out and if interested in one of them, do contact their support team to ask about their migration policy. Most web hosts do this at no extra cost to you.
- Suggested Tutorial: How To Customize The Look Of The H2 & H3 Tag
- Bonus Tutorial: Replace the Default Comment Avatar Image With Your Own
Always backup your blog before you edit a line of code or even install a plugin. This is 1 thing that you need to drill into your head. Trust me, this extra step each day could potentially one day save you hours and hours of time.
If you have found this tutorial helpful, please consider sharing it online with your followers.
Hi, Derek. Your ideas are very helpful. But, is it really needed ? Because many of popular themes like DIVi, X, Thrives, Genesis etc have these kinds of features.
It is needed and this blog post is only for bloggers who are running the Genesis Framework on there blog. I mentioned this in the blog post. Also not all themes created for the framework have these little changes in them.
Hi Derek.,
Thanks for your guideline to modify a Genesis Framework child theme. Hope the users will be benfitted from your guidance.
Thank You for your comments.
Your provided a kinda awesome coding techniques to improve Genesis framework. It was really helpful for me buddy, thanks alot.