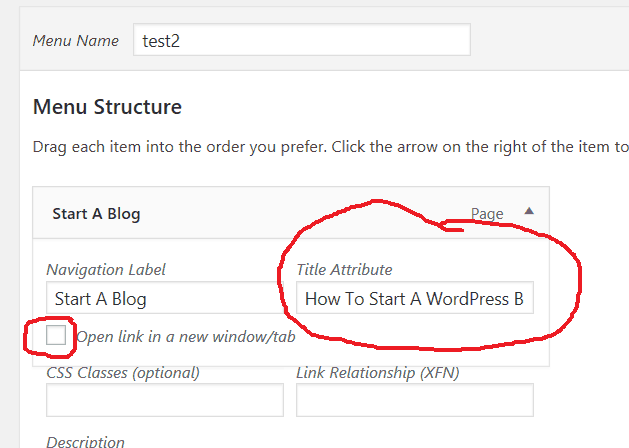
The title Attribute is sometimes forgotten and I am of course referring to the WordPress menu’s. Since most of the time we cannot add the full blog page title to our menu bars, we use 1 or 2 words to describe them. The best way to add the full title to these menus is by using the Title Attribute feature in the custom menu section of your dashboard.
When you hover your mouse over a word in your menu bar, the full title will appear in a small box. Go ahead and over your mouse over one of our menu titles in the top navigation bar for an example. In this blog post, I will show you how to add this type of title.
The reason we want to add this type of attribute is to help visitors understand what the page is all about and convince them that the page is very useful. It tends to be the details that make a blog successful and it starts with a small change such as title attributes. Follow the instructions below to make this change.
Title Attribute For The Menu Bar
Incase you have not created a menu bar yet, click on the link on the image below to create one.

Name the menu and save it.

The next step is to select where to place it. This is different for each theme. Click on the tab manage locations to select where to place this menu. After you add pages, categories or links to your menu, make sure to save it. It’s time to add a Title Attribute to the words. For an example, hover your mouse over a menu button on WPOutcast. Notice, the longer title which explains what you will find on that page. This is simple to do.
It’s fairly intuitive from here.

Make sure you save the menu when you are done adding in the long form titles. These titles are useful since some themes, such as WPOutcast, don’t normally let you create such a long title. Hence why the title Attribute is so important and is typically a forgotten built-in feature
Next Up To Read:
If this blog post has been helpful, consider sharing it online with your followers.

Leave a Reply