There are several ways of adding a “back to top” link in the footer of a Genesis Framework theme. The easiest solution is by using a plugin. The thing is, too many plugins can hurt a blog’s performance, so when you can add a code instead, it’s a plus.
If you prefer to use a plugin, I have listed below the one plugin that won’t slow down your blog too much. It adds an arrow in the bottom right-hand side of the page after the visitor scrolls down the blog a certain percentage.
Recommended Plugin For “Back to Top” Button
Just install and activate. Here is what it looks like after you scroll down a certain length.

If you do not have the Genesis Framework installed, find out how easy it is to Install A Genesis Framework Theme. This is the best framework out there and they continue to improve with each update.
- Recommended Read: Mega List Of Updated Genesis Framework Plugins
Let’s get to how to add a “back to top” button using a piece of code.
“Back To Top” Button Using Code
We are going to use 3 codes today and then upload an image. The end result is this button – the color of the button can be customized using the Style.css File.

First, open up your functions.php file and add this at the bottom and save changes.
// Enqueue To Top script
add_action( 'wp_enqueue_scripts', 'to_top_script' );
function to_top_script() {
    wp_enqueue_script( 'to-top', get_stylesheet_directory_uri() . '/js/to-top.js', array( 'jquery' ), '1.0', true );
}

// Add To Top button
add_action( 'genesis_before', 'genesis_to_top');
	function genesis_to_top() {
	 echo '<a href="#0" class="to-top" title="Back To Top">Top</a>';
}
Then, open up your style.css file and add this code to the very bottom. Note that you can change the colors using this code. I left everything the same color as the screenshot above. Also, this code works for mobile devices. Save changes and proceed to the next step.
.to-top {
	display:inline-block;
	height:40px;
	width:40px;
	position:fixed;
	bottom:40px;
	right:10px;
	box-shadow:0 0 10px rgba(0,0,0,0.05);
	overflow:hidden;
	text-indent:100%;
	white-space:nowrap;
	background:rgba(232,98,86,0.8) url(images/to-top.svg) no-repeat center 50%;
	visibility:hidden;
	opacity:0;
	-webkit-transition:all .3s;
	-moz-transition:all .3s;
	transition:all .3s;
}

.to-top.top-is-visible {
	visibility:visible;
	opacity:1;
}

.to-top.top-fade-out {
	opacity:.5;
}

.no-touch .to-top:hover {
	background-color:#e86256;
	opacity:1;
}

@media only screen and (min-width: 768px) {
	.to-top {
		right:20px;
		bottom:20px;
	}
}

@media only screen and (min-width: 1024px) {
	.to-top {
		height:60px;
		width:60px;
		right:30px;
		bottom:30px;
	}
}
Open up notepad on your computer and copy the code below in notepad but do not save it yet. I’ll show you how to save this and the name as well.
jQuery(document).ready(function($){
	// Scroll (in pixels) after which the "To Top" link is shown
	var offset = 300,
		//Scroll (in pixels) after which the "back to top" link opacity is reduced
		offset_opacity = 1200,
		//Duration of the top scrolling animation (in ms)
		scroll_top_duration = 700,
		//Get the "To Top" link
		$back_to_top = $('.to-top');

	//Visible or not "To Top" link
	$(window).scroll(function(){
		( $(this).scrollTop() > offset ) ? $back_to_top.addClass('top-is-visible') : $back_to_top.removeClass('top-is-visible top-fade-out');
		if( $(this).scrollTop() > offset_opacity ) {
			$back_to_top.addClass('top-fade-out');
		}
	});

	//Smoothy scroll to top
	$back_to_top.on('click', function(event){
		event.preventDefault();
		$('body,html').animate({
			scrollTop: 0 ,
		 	}, scroll_top_duration
		);
	});

});
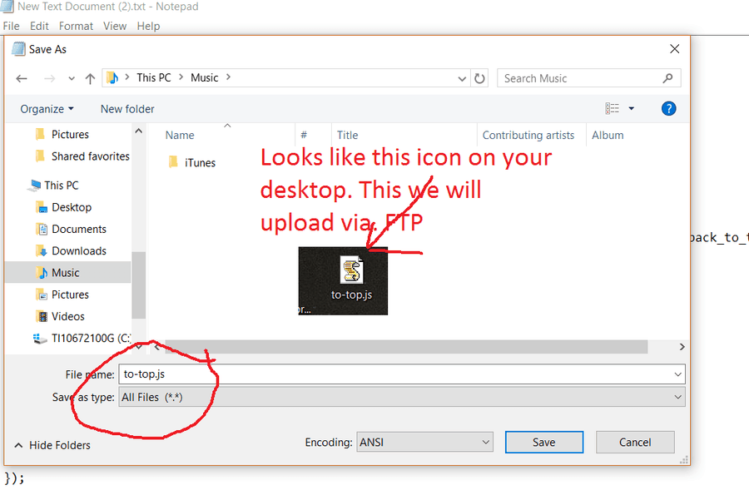
You need to save this file as to-top.js. To convert a notepad file into a to-top.js file make sure you have the exact selections in the image below.

Upload this file into your child theme’s “js” folder. If there is no js. folder, create one in your child theme folder.
Download this file (Download link) and upload that image to your theme’s “uploads” directory. That’s it, you should now have the button on your blog. Scroll down a bit to see it.
Clear your blogs cache and browser cache as well.
If this post has been helpful, do consider sharing it online with your followers.

Thanks. Its really work. For the image background to top actually not work. I don’t know why but I have change it just by use HTML only. Really thanks for the code. Its nice.
You should upload the svg into your child theme’s image folder, not to WP Uploads, and then it will work.
thanks for sharing. useful article