No blog is spam free and I mean no blog. It does not matter if the blog that you is reading is a huge company worldwide. Every blog owner has multiple protection’s in place to help combat spam besides having blog editors reviewing every comment before it goes live. I do recommend that you first make the follow changes to your blogs “Discussion” settings before we get into the Akismet anti-spam plugin.
WPOutcast Recommended Settings

Though you can make any changes that you want to on the page above, I’ve found out the settings I have chosen works best for me as no spam comment will ever be live on the blog. In addition to the Akismet plugin, I will recommend you create a free account on the Cloudflare website for even more protection. Let’s get to the Akismet plugin that the free version is all that you’ll need.
Akismet Plugin Installation
Let’s just start with what does the Akismet plugin do?
Akismet is an advanced hosted anti-spam service aimed at thwarting the underbelly of the web. It efficiently processes and analyzes masses of data from millions of sites and communities in real time. To fight the latest and dirtiest tactics embraced by the world’s most proficient spammers, it learns and evolves every single second of every single day. Because you have better things to do.
Source: https://akismet.com/
Features
- Automatically checks all comments and filters out the ones that look like spam.
- Each comment has a status history, so you can easily see which comments were caught or cleared by Akismet and which were spammed or unspammed by a moderator.
- URLs are shown in the comment body to reveal hidden or misleading links.
- Moderators can see the number of approved comments for each user.
- A discard feature that outright blocks the worst spam, saving you disk space and speeding up your site.
This is a light-weight plugin and once you have this all set up, you can move on to better things on your blog such as pumping out content or building backlinks to it. I understand that there are thousands of plugins out there to help fight spam on your blog but I have been using this plugin, CloudFlare and I’ll toss in 1 bonus plugin that I use that kills all spam.
Click on this Link to download the plugin. Upload the plugin through your admin dashboard’s plugin section. Now we have to get this plugin connected/enabled which takes very little time to do.
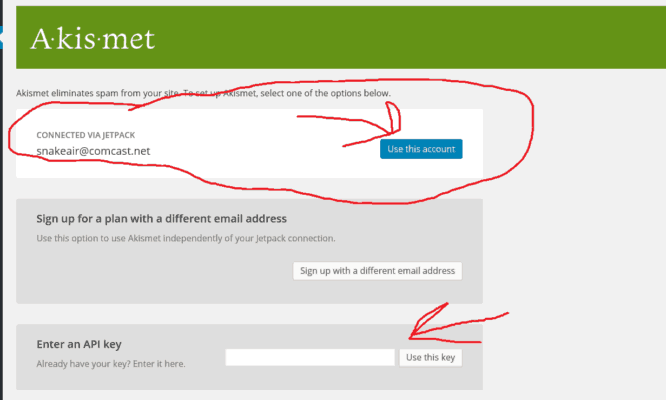
Since I am using the JetPack Plugin made by Automattic and this plugin is also part of Automattic’s family, I can connect this plugin with 1 click like shown in the image below.

For my sake, I’m going to click on the use this account button to enable the plugin on the blog. If you have never used this plugin before, follow the instructions in the link below.
First of all, you will need to have an API key to use in the other box I circled in the image above. Go and Get an Akismet API Key right now for free.
Did you arrive at this page yet?

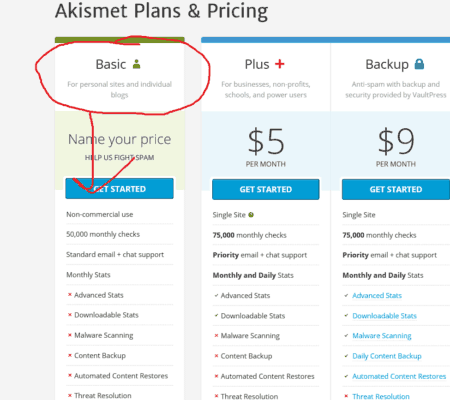
If so, click on the Getting Started button. OMG, it’s a payment page you just landed on. Don’t worry, just move the “price” bar to zero as the free version is all that you’ll need because I’ll share some bonus spam protection tips later on in the blog post. You should now see what you see in the image below.

Click on the Continue button to proceed to the next step. Please note you might have to actually register if you do not have an account yet. I have one so I was logged in automatically which lead me to the follow page below where I can now copy the “API” code to use in the plugin settings page.
On the page below, click on the “eye” button to see your API code and copy that code to put it in the correct box to activate this plugin.

On the official Akismet page that you just created an account on, do explore your account and see what they have to offer on there after you get this plugin active on your blog of course. After you insert your API key and save changes, this plugin is now active on your blog and help combat the spam.
Up To Date Stats

Additional Spam Protection
I’ve found out that just using this plugin is not enough to over-all protect your blog and by using a combination of things, it has helped my life running my blogs a lot easier.
Install the WordFence Security plugin. This plugin is amazing and has a ton of security measures that helps protect your blog in many other ways. Visit their official website to learn a lot more at wordfence.com.
Last form of protection is the most widely known one which is Cloudflare. Go ahead and sign up for a free account and once you are done with all the on-screen instructions, I just have 1 recommendation of settings for you to enable. The rest of the features that you get, it’s up to you on what you want to do.
Go to the Scrape Shield tab and select the following settings:

In conclusion, your blog is 90% more spam free and safer from it was about 15 minutes ago. You need to take spam and other threats seriously on your blog. Always make a full backup of your blog once a day and never forget to do this. It does not matter how well protected your blog is, things can happen and if you are prepared with your backup, you can get the blog back up within hours or less than that. Backups are done every 24 hours by WPOutcasts web host which is Cloudways. I never have to worry about doing one.
If this tutorial has helped you in any way, please consider sharing this with your followers.

Very nice article, keep up the good work
Hi,
Very good blog. Information in the above blog is nice for future point of view.
Thanks for sharing.
Keep up the good work.