Congratulations for choosing Cloudways as your web host! Since Nov. 2015, WPOutcast has been with Cloudways and the results have been fantastic. The main reason I love Cloudways is the support it offers. Earlier in 2016, I switched the blog over to SSL and had major problems with redirects – so, I got in touch with Cloudways live-support and within a half-an-hour, the issue was fixed on their end. The support tech would not give up until my problem was resolved!
Recommended Review
In this blog post, I am going to show you step by step how to install a new WordPress blog. In case you already have a WordPress blog and want to migrate it over, I created a tutorial back in Nov. 2015 when I did this myself when I purchased a Cloudways account. Check out this guide on How To Migrate WordPress To Cloudways Hosting to see the steps I had taken. However, you can get there support team to do this for you.
Let’s get to installing a fresh blog.
Fresh WordPress Install Steps
Go ahead and login to your account and you should now be on this screen below.

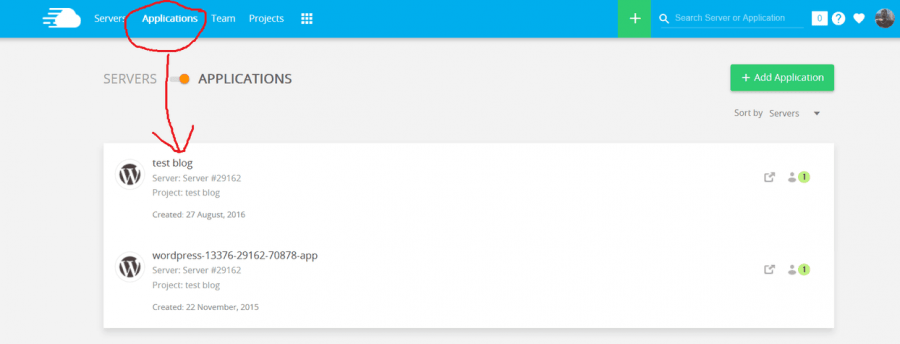
Next step is to click on the applications tab and create a new application (this will become your new WordPress blog). You should be in the screen below and it should be blank if this is a new Cloudways account and you have not migrated any other blogs. As you can see below, you are able to create multiple blogs.

The next thing we need to do is click on add application and in the pop-up box select your server which should be the only option listed in the drop-down menu. (see example below)

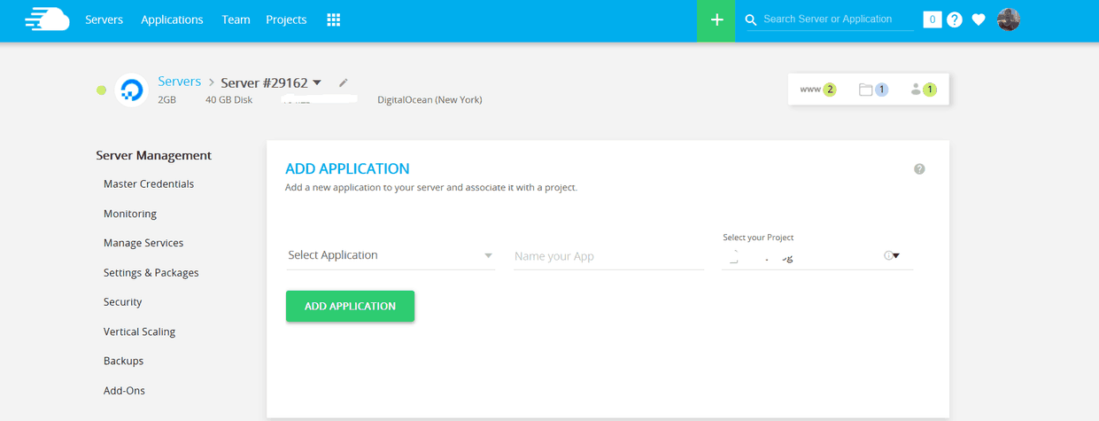
You should now be on the following page. This is where we will install the latest WordPress version.

What we need to do now is name your application. This name won’t be the actual name of your blog so you can name it anything. This is important if you plan to install more than 1 blog so you differentiate between them. Let’s name this application like so:

Next, let’s select the latest blog version which will always be listed in the drop-down box. Just click on the select application text to bring up a menu and select the latest version of WordPress. Then click add application to begin the installation. At this point, you should be looking at the download screen below.

After 2 minutes, the blog will be installed and you should be back at the homepage dashboard of your account like so. Where I have circled in red is what you click on to go to your blog. Because I have 3 different blogs installed, I have to click on this and select the new one I just created. We want to make sure we can login to our new blog after installing it.


Your next step is to attach this blog to a domain. You can view detailed instructions through their help section: How Do I Take My Website Live From Cloudways?

For the domain registrar, I have my blogs on Cloudflare so my name servers are changed to reflect this. Let’s get to logging into your blog.
After you choose a domain to your new blog that you just installed, to access the admin panel easily and find out the automated password given, you should be on this page below.

Click where the arrow is pointing to go to your blog’s login page to sign in with the information provided. If you click on the “eye” icon, you’ll see your password which you will need to access your blog.
Congrats You Did It!
Congrats on installing a WordPress blog on Cloudways. As you can see, it’s not hard to do and you can create multiple blogs at your leisure… If you want to use 1 blog for a test blog, skip the domain management section as you don’t want to attach the blog to a domain. This is what I did and I can still log in to my test blog and do whatever without the search engines finding the blog.
Need a Domain? I have used both businesses below and have had no issues so far
If you have any questions or looking for a reliable WordPress Hosting, please ask away in the comment section. If you want me to create a blog for you, contact me for details and pricing.
Don’t forget to share this blog post with your followers if you found it helpful.

Hi Derek Price your article is very good keep uploading these kind of articles:) !!!!!
This is a great method