
Have you heard of about cloud hosting? If not, you are missing out on fantastic web hosting service. This type of hosting is becoming popular, as it is the most affordable way to host your site. Cloud hosting uses the resources of a cluster of servers to host your website. This means that your website uses virtual resources from several servers for the different aspects of hosting your site. Because of this, your load time is much faster than shared web hosting and even some managed web hosting companies.
WPOutcast has moved to the cloud! We have been with Cloudways web hosting since late November 2015. If you have visited the blog in early 2015, you’d notice the difference in page speed, which is incredible, because we’re using more plugins and images than ever before!
The only downtime in recent months was when the server had to be restarted and that lasted a few minutes. Other than that no downtime at all.

Here is a guide on migrating over to the cloud. You could also request that their staff do this if you don’t feel comfortable doing it on your own.
Migrating To Cloudways
To become a client of Cloudways you can sign up for the free 14-day trial. This gives you 14 free days to test out the service and see the improvement on your site. Use the Digital Ocean server to get this free trial. You can cancel at any time and migrate back to your old web host. Here is a peak of the pricing packages. This is affordable for most bloggers starting out.

WPOutcast is on the $30 plan with room to grow. In my hosting dashboard, I can edit some important server settings. I chose 2GB memory for my selection. See example below.

By far, Cloudways is the best web host I ever had. Since I started blogging, I have changed web hosts once every year. I could never find an option that was affordable, fast, and left me room to grow, but now I have! Do visit their homepage to read more about cloud hosting. Here’s some professional advice from the WPArena office team: As you embark on the first steps of creating your website, keep in mind the whole picture that you are trying to achieve, too often we see young webmasters spiral into a tangent that is not part of the core SEO strategy that they are aiming for. Avoid getting off track until the trip is well over!
Step 1 – Purchase A Plan
To get started you need to choose a plan and follow the onscreen instructions. Let’s start with a free trial. You can upgrade to a paid membership at any time during your hosting.
Please take notice of the free trial sign up screen. You do have 3 options in order to create an account. Let’s get started by creating your account first.

Continue on to the next page of Cloudways to start your free trial. Keep in mind you will have to verify your account by clicking on a link in your email. After you activate your account you will see this page.

Select Digital Ocean from the selections shown above because you will get a free 14-day trial. Select WordPress from the Cloudways options you see available below.

Now you get to select the server settings and the location of the server. The below image shows the next step.

Select the number of page views that your blog gets or close to it. You can also click on the I know my server size tab. Select the memory size. 1GB or 2GB is what you should select for now. Below is the location. Select the closest country or state near you. This is very important. Next, click on the start 14-day free trial button that’s in the footer.
- Suggested Tutorial: Reward Your Audience With Web Hosting Promo Links

Wait for about 6 minutes while your account/server is set up for you. After this is done, it’s time for the migrating process. This is an easy process, but you can always contact support for help.

Step 2 – Migrate Content To Cloudways
You can actually migrate your blog’s content and database over to Cloudways with the help of a plugin. Install the Cloudways WordPress Migrator free plugin. This plugin will do all the migrating, you just need to enter some data and presto, the migrating process begins!

To get all this information, I hope you still have your Cloudways dashboard open. If not, login to your account and you should see the screen below or something similar. Notice the arrow pointing to the Applications tab that you want to be on for the next step.

You should now be on a page similar to what is shove above which has your wordpress application on it. Click on the 1 application in their which is your blog so we can find the information to copy into the migrator tool.
If you are on this page, you’ll find all the information needed on it. If you have any questions, post them in the comment section.

Enter the following into your Migrater plugin’s settings page:
- Enter your email address (the one you registered with)
- Your destination site URL, which is hosted on your Cloudways server.

- Enter your Application Folder Name. You can find the Application Folder Name in the Application Management tab
- Enter your Server IP address (in Cloudways, click the server tab to find the public IP address)

- SFTP Username. This is your Master username that you can find in the Server tab.
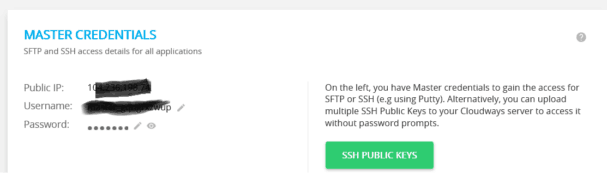
- SFTP Password. This is your Master password that you can find in the Server tab under master credentials.
- Click on “Migrate” button to start migrating your website.
Keep in mind that this could take a while depending on the size of your blog. You should be seeing these images throughout the migrating session.

Step 3 – After Migrate Finish’s
After the migrate process is over, just follow the instructions on this page to complete the other process of taking your site live with Cloudways.
- Read: How do I take my website live from Cloudways?
- How To Install WordPress On Cloudways – Step By Step Guide
Migrations are very critical for IT enthusiast as are there are chances of migration failure and data loss hence choosing a reliable email migration services provider with 24*7 top-notch support is a tough decision. Learn more about application software hosting such as QuickBooks Enterprise cloud with Apps4Rent.
That’s it, you have just switched over to Cloudways on a 14-day free trial. See your account profile to upgrade to a paid hosting package.
If you have found this tutorial helpful, please consider sharing it online with your followers.
Hi Derek,
I work at Cloudways as the Community Manager. It is nice to read your guide about migrating WordPress sites to Cloudways.
The review is great, but I would like to tell you that we have a new platform that we launched recently. The screenshots you took are from the old console.
The new platform has more features and a much better UI that I think you would definitely like. Your feedback about the new UI will also be helpful to us.
P.S. You have nice site. I have subscribed to your newsletter. Looking forward to read your content :)
Thanks for your information. I just noticed everything last night when I logged into my Cloudways account. Will update the blog post in a day or so.