Have you ever made any drastic changes to your URL structure on your blog, or edited a few pages/blog posts and now have that old URL going to your 404 page? This is very bad for SEO and you really need to redirect the bad URL to the correct one or a similar blog post. If you do not have the Yoast Premium SEO plugin installed, you are missing out on this awesome redirect extension feature and as well as the other useful perks this premium plugin provides.

I have the single site license at a cost of $69 which is a very good price for all the extra extensions we get. Keep in mind, you don’t get any new special SEO settings but you do receive many extensions with very useful tools. This blog post will walk you through the simple process of redirecting a bad link and having control over setting the URL as a 301, 302 or a 307 status.
What do these statuses mean?
Incase you didn’t know this, here is what the redirect status codes mean/do:
- 301- Your Web server thinks that your URL has been permanently redirected to another URL. The client system is expected to immediately retry the alternate URL. – Source
- 302 – Your Web server thinks that your URL has been temporarily redirected to another URL. The client system is expected to immediately retry the alternate URL. – Source
- 307 – Your Web server thinks that your URL has been temporarily redirected to another URL. – Source
Setting Up a 301 Redirect
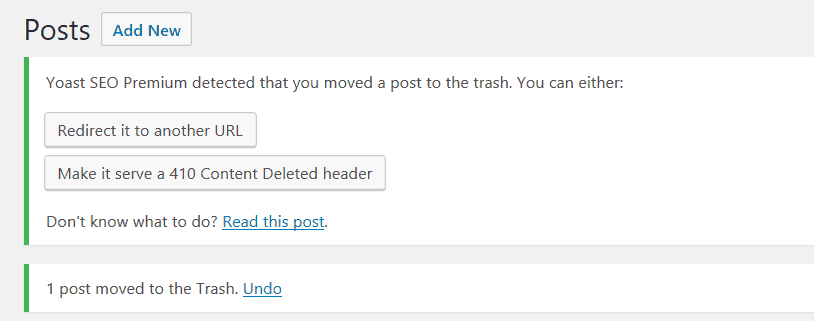
I would recommend you use the 301 redirect when you change a URL. Chances are you will never change that URL again so you want a permanent redirect. The Yoast SEO plugin will show you a message when you delete/edit a URL to determine if you want to redirect it or not.

Click on “redirect to another URL” button so you can redirect this deleted post to the homepage or a similar blog post. Anything is better than a 404 page.

You will know this worked after you save the changes above and see this message below.

Now if you missed that message for some reason, you can just navigate to your redirect settings page within the Yoast SEO settings page. Here is an example of a URL I changed that was redirected automatically. Go test it out and see it redirect to the new URL.

Manually Add Redirects and Control the Status code
I have mentioned it before, this plugin is awesome and it’s easy to use the premium features made available. Just fill in the URLs in the box and hit the redirect blue button.

You have options to edit the redirect URLs that you created or delete them. There are other plugins that will redirect your bad URLs but I prefer having a plugin that has multiple features so I can install fewer plugins, which will help a blog’s performance.
Consider buying the Premium SEO plugin and get some new features like the ones I have below. The support for the premium plugin is 100% times better than using the free support method of creating a thread on their plugin support forum. Yoast Staff actually help you until your issue is resolved and in a timely manner.
- Also Read: How To Set Up The Yoast Premium SEO Plugin
If you have the premium version installed, what is your opinion so far on the extra’s we have access to?
Don’t forget to share this blog post to your followers if it’s been helpful.

Good work sir
keep it up
Hi derek
very nice article, keep up the good work